Enter & Print Quck Check
This is for the need to print an occasional check. It prevents the need for having to enter an item through Accounts Payable and then writing a check from there.
Select Transactions - Quick Checks
A quick check will automatically credit the Cash account specified and debit the Expense account specified UNLESS you select NO to save to your transaction file.
Tip: You have the option to print a check with or without saving it to the transaction file preventing a Debit or Credit from being made.
For example, a Revenue check, Accounts Payable check, ect. gets lost in the mail. To replace this lost check you can write a quick check and select NO to save to transaction file. No Debit or Credit will be made in the Transaction file - preventing double posting of this check. Then go through the Bank file and edit the check number of the original check to reflect new check issued. Be sure to call your bank and stop payment on the original check.
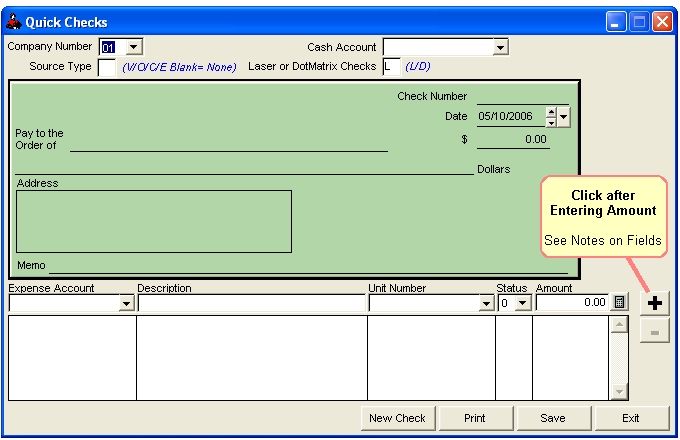
NOTES ON FIELDS FOR QUICK CHECKS
COMPANY NUMBER: The company this check will be assigned to.
CASH ACCOUNT: This is your bank account number nomally 11010-11020.
SOURCE TYPE: You will enter a V/O/C/E or leave it blank. V= Vendor, O=Owner, C=Customer and E=Employee. If you leave it blank then you will need to type in a name to which you want the check to be written to. If you enter “V” then you will select a Vendor number in the Pay to the Order of field.
PAY TO THE ORDER OF: You will need to enter a Vendor, Owner, Customer or Employee number. We added a drop down box for an easy lookup. If you leave the Source Type blank then you will need to type in a person or company name to which you would like the check to be made out to.
ADDRESS: The Vendor, Owner, Cutomer or Employee address will automatically pull up from their respective files. If you leave the Source Type blank then you will need to enter in the person or companies address. You also have the option to just leave it blank with no address.
CHECK NUMBER: Enter the check number you would like to be printed on your checks.
MEMO: You can type in your own Memo or leave it blank. Another option is if you selected the Source Type as a “V” and in the Pay to the Order of field you entered in Vendor number 10000 then it will put in Vendor number 10000 memo in the memo feild, which is stored in the Vendor file. The Memo field can also be used as an Account number field.
EXPENSE ACCOUNT: This is the expense account you want this check to be debited. You have a drop down box along with the auto complete.
DESCRIPTION: The description will automatically pop up as the expense account GL numbers descrition from the Company Chart of Accounts. If you do not want that description you can always type in your own and it will override the default description.
UNIT NUMBER: You do not have to enter a Unit number but, if you do not it will not be billed out and picked up on your Operating Statements.
STATUS: A status is not required if you do not enter a Unit Number. If you do use a Unit Number then it will default to the Unit’s default status level.
AMOUNT: This is the dollar amount you want to write the check for.
After entering your dollar amount you will need to click on the PLUS SIGN button. You then have three options, you can start a New Check, Print the check or Save the check.
NEW CHECK BUTTON: If you select the New Check button the check will not print or save. The cursor will go back up to the Company number field and the all other fields will be zeroed.
PRINT BUTTON: Once you select the print button you will be asked if you would like to print an Alignment Check. We always recommend doing this. Roughneck will then count your checks and tell you the Total Checks required. You will then be asked if you would like to save this check to the Tran File. If you say Yes, it will write the credit and debit to the Transaction file. If you say No, you will not be able to track this transaction. It will be like you never wrote the check as far as Roughneck is concerned.
SAVE BUTTON: If you select to Save you will be asked if you would like to Save before printing. If you select that you do not want to print and you just want to save, you will not be able to pull up this transaction and print it at a later date. This transaction will only be saved to the Transaction file.
Note for several entries on One Check
If you have several entries or invoices you want this check to pay then after your first entry click on the Plus Sign button, then you will notice the cursor defaults back to the Expense Account field. You will need to enter your second entry click on the Plus Sign button again then you will notice in the dollar amount field the two entries will be combined.
Related Topics
How to Change the Format of the Quick Check ~ Checks Used by Roughneck ~ Print Check Listing Report ~ Print List of Checks and Deposits ~ How to Edit Checks and Deposits ~ How to Reconcile your Bank Statement
Roughneck Help System 02/15/07 10:30 am Copyright © 2006, Roughneck Systems Inc.